Sending the URL by E-mail
This section explains how to send the URL of a scanned file by e-mail.
Use this function if network restrictions prevent you sending attachments by email.
![]()
Depending on your e-mail application, a phishing warning might appear after you receive an e-mail message. To prevent phishing warnings appearing after you receive e-mail from a specified sender, you must add the sender to your e-mail application's exclusion list. For details about how to do this, see your e-mail application's Help.
![]() In [Scanner Features], on the [Send Settings] tab, press [Stored File E-mail Method], and then select [Send URL Link].
In [Scanner Features], on the [Send Settings] tab, press [Stored File E-mail Method], and then select [Send URL Link].
For details about specifying the setting, see "Scanner Features", General Settings Guide.
![]() Return to the initial scanner screen, and then press [Store File] to select [Send & Store].
Return to the initial scanner screen, and then press [Store File] to select [Send & Store].
To send the URL by e-mail, you must select [Send & Store].
![]() Press [OK.]
Press [OK.]
![]() Specify the e-mail destination, make any other necessary settings, and then send the e-mail.
Specify the e-mail destination, make any other necessary settings, and then send the e-mail.
For details about sending e-mail, see "Basic Operation for Sending Scan Files by E-mail".
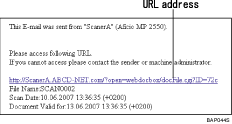
An e-mail similar to the following will be sent to the destination:

![]() In the e-mail destination, click the URL.
In the e-mail destination, click the URL.
Web Image Monitor starts.
![]() View, delete, or download the file over the network using Web Image Monitor.
View, delete, or download the file over the network using Web Image Monitor.
![]()
For details about Web Image Monitor functions and their settings, see "Monitoring and Configuring the Printer", Network Guide.
It is recommended that you use Web Image Monitor on the same network environment.
Depending on the environment, even if you click the URL in the file sent by e-mail, the browser may not start and you may not be able to view the file. If this happens, click the same URL again, or manually enter the URL in the browser's address bar.
To display details about the functions for managing stored files using Web Image Monitor, click [Help] on the upper right of each Web browser's window.
You can send the URL by e-mail and simultaneously send it by Scan to Folder. In this case, the file is sent to the Scan to Folder destination, not the URL.

