
| |||
This section describes the screen layout when sending scan files by Scan to Folder.
The function items displayed serve as selector keys. You can select or specify an item by pressing it. When you select or specify an item on the display panel, it is highlighted like [![]() ]. Keys that cannot be selected appear like [
]. Keys that cannot be selected appear like [![]() ].
].
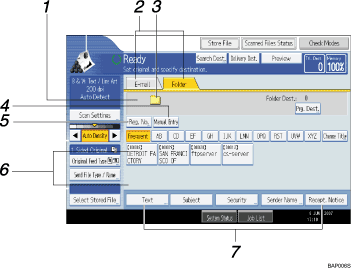
Destination field
The specified destination appears. If more than one destination has been specified, press [![]() ] or [
] or [![]() ] to scroll through the destinations.
] to scroll through the destinations.
E-mail/ Folder
Press to switch between the Scan to Folder screen and E-mail screen.
Also switch the screen when sending a file simultaneously by both Scan to Folder and e-mail.
Scan to Folder icon
Shows that the Scan to Folder screen is displayed.
[Manual Entry]
To specify destinations not registered in the address book, press this button to display the soft keyboard, and then enter the address of the destination folder.
[Reg. No.]
Press to specify a destination using a five-digit registration number.
Destination List
The list of destinations registered in the machine appears.
If all of the destinations cannot be displayed, press [![]() ] or [
] or [![]() ] to switch the screen.
] to switch the screen.
The (![]() ) symbol indicates a group destination.
) symbol indicates a group destination.
[Text] [Subject] [Security] [Sender Name] [Recept. Notice]
Enter the message and specify the subject, e-mail security (encryption and a signature), sender, and whether or not to use Message Disposition Notification. The entries will be used for e-mail transmission when sending files simultaneously by Scan to Folder and e-mail. For details, see "Sending Scan Files by E-mail".
| Copyright (C) 2007 |