Using the Print Job Function
This describes how to print files stored in the machine.
The following types of printing can be selected using the printer driver: Sample Print, Locked Print, Hold Print, and Stored Print.
You can print or delete the print jobs stored in the machine which is sent from computers.
If you select Sample Print, Locked Print, and Hold Print, the print files stored in the machine are deleted after printing is completed. If you select Stored Print, the files remain in the machine even after printing is finished.
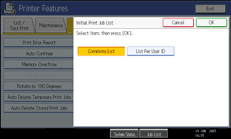
If you press [Print Jobs] on the Printer screen, the Complete List or the List Per User ID screen appears depending on which list type you select from [Initial Print Job List].

Complete List
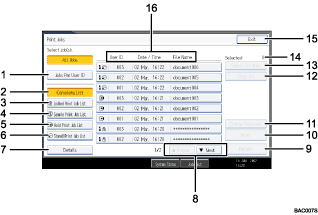
If you select [Complete List] from [Initial Print Job List], the following screen appears:

[Jobs Per User ID]
Displays List Per User ID.
[Complete List]
Displays all files stored in the machine.
[Locked Print Job List]
Displays only Locked Print files stored in the machine.
[Sample Print Job List]
Displays only Sample Print files stored in the machine.
[Hold Print Job List]
Displays only Hold Print files stored in the machine.
[Stored Print Job List]
Displays only Stored Print files stored in the machine.
[Details]
Displays details about a selected file.
[
 Previous] / [
 Next]
Next]If the list of files does not fit on the screen, scroll up or down to view the list.
[Delete]
Deletes a selected file.
[Print]
Prints a selected file.
[Change Password]
Changes or deletes the password of a file if a password is set. To change the password, press [Change Password], enter the current password, and then enter the new password on the confirmation screen. To delete the password, press [Change Password], leave the entering/confirming a new password box blank, and then press [OK].
You can also set passwords to the Stored Print files that do not currently have passwords.
[Clear All]
Clears all selections.
[Select All Jobs]
Selects all files stored in the machine.
[Selected:]
Displays number of the files selected.
[Exit]
Returns to the Printer screen.
User ID, Date / Time: , and File Name: display
Displays the time when the instruction to print the stored files was entered, the User IDs, and the file names.
List Per User ID
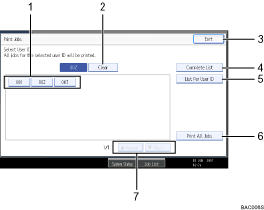
If you select [List Per User ID] from [Initial Print Job List], the following screen appears:

User ID
Displays the User IDs who sent files to the machine.
[Clear]
Clears a selection.
[Exit]
Returns to the Printer screen.
[Complete List]
Displays all print jobs.
[List Per User ID]
Displays the print job list of each ID.
[Print All Jobs]
Prints all selected type of files sent by the user ID.
[
 Previous] / [
 Next]
Next]If the list of files does not fit on the screen, scroll up or down to view the list.
![]()
Multiple files can be selected on the Print Jobs screen. To clear selection, press the selected print jobs again.
The display is not updated if a new file is stored while the list of stored files is displayed. To update the display, press [Exit] to return to the Printer screen, and then press [Print Jobs] again.
If a large number of print jobs is stored in the machine, processing may slow temporarily, depending on which functions are used.
If you press [List Per User ID] in the Complete List screen, the screen switches to the List Per User ID screen where [Back] appears at the bottom right. Press [Back] to switch to the Complete List screen.
For details about Sample Print, Locked Print, Hold Print, and Stored Print, see "Printing from the Print Job Screen".

