

  |  | ||
When the printer is turned on, the following screen appears if an optional hard disk is installed in the printer.

If you press [Prt.Jobs] on the initial screen, a screen prompting to select the type of print job appears.

After selecting a type, you can select print files in the list by pressing:
[Job List]
Displays the Job List screen.
[User ID]
Displays the User ID screen.
If you select Sample Print, Locked Print, and Hold Print, the print files saved in the printer are deleted after printing is completed. If you select Stored Print, the files remain in the printer even after printing is finished.
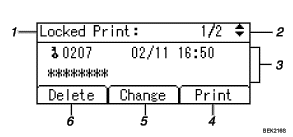
Job List Screen

The type of print jobs
Displays the type of the print job you select.
Page number
Displays the current page number. Each time pressing the [![]() ] or [
] or [![]() ] key, the screen switches.
] key, the screen switches.
User ID, Date/Time, and File Name display
User ID shows the user's ID set by the printer driver.
Date and Time show the time at which the print job was stored in the printer.
File name shows the name of the file. However, "****" is shown instead of the file name for a Locked Print file.
[Print]
Prints a selected file.
[Change]
Changes or clears the password of a file if a password is set. To change the password of a Locked/Stored Print job, press [Change], enter the current password, and then enter the new password on the confirmation screen. To clear the password, press [Change], leave the entering/confirming a new password box blank, and then press the [OK] key.
You can also set passwords to the Stored Print files that do not currently have passwords.
[Delete]
Deletes a selected file.
![]()
When you press [Change] to change or clear a password, you must first enter the existing password. If the password you entered is incorrect, you cannot change or clear any current passwords.
You can use [Change] to set or clear passwords only when Stored Print files are stored in the printer.
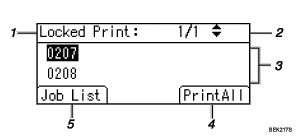
User ID Screen

The type of print jobs
Displays the type of the print job you select.
Page number
Displays the current page number. Each time pressing the [![]() ] or [
] or [![]() ] key, the screen switches.
] key, the screen switches.
User ID
User ID shows the ID of the user who stored the selected type of files.
User ID set by the printer driver is shown.
[PrintAll]
Prints all files stored by the user whose user ID has been selected.
[Job List]
Switches the screen to the [Job List] screen.
Displays the print jobs of the selected user only.
![]()
To cancel selecting a file, press the [JobReset] key.
The display is not updated if a new file is stored while the list of stored files is displayed. To update the display, press the [Menu] key to return to the initial screen, and then press [Prt.Jobs] again.
If a large number of print jobs are stored in the printer, processing may slow temporarily, depending on which functions are used.
![]()
For details about printing each type of print job, see the followings: