

  |  | ||
Follow the procedure below to adjust where to start printing on paper loaded in each paper tray after checking the test pattern printed.
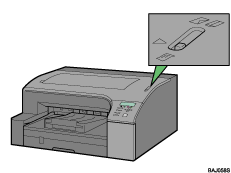
Slide the envelope selector to ![]() the forward position.
the forward position.

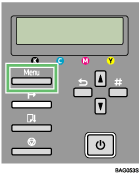
Press the [Menu] key.

Press the [![]() ] or [
] or [![]() ] key to display [Maintenance], and then press the [#Enter] key.
] key to display [Maintenance], and then press the [#Enter] key.
| Menu: Maintenance |
Press the [![]() ] or [
] or [![]() ] key to display [Registration], and then press the [#Enter] key.
] key to display [Registration], and then press the [#Enter] key.
| Maintenance: Registration |
Press the [![]() ] or [
] or [![]() ] key to display [Pr.Test Pattern], and then press the [#Enter] key.
] key to display [Pr.Test Pattern], and then press the [#Enter] key.
| Registration: Pr.Test Pattern |
Press the [![]() ] or [
] or [![]() ] key to select a paper tray, and then press the [#Enter] key.
] key to select a paper tray, and then press the [#Enter] key.
| Pr.Test Pattern: Tray 1 |
Press the [![]() ] or [
] or [![]() ] key to select a paper type, and then press the [#Enter] key.
] key to select a paper type, and then press the [#Enter] key.
| Pr.Test Pattern: *Plain Paper |
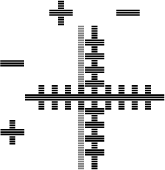
A test pattern to adjust the print start position is printed.
Check the optimal adjustment values on the printed test pattern.
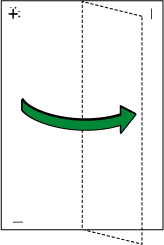
Fold the test pattern sheet in half lengthwise.

The optimal adjustment value is the difference between the single vertical line and the cross's vertical line that you can see when the folded paper is held up to light. When the difference is one calibration mark in the “+” direction, the optimal adjustment value for the [Read Direction] is “+1.0”.

Fold the test pattern sheet in half widthwise, and then check the adjustment value for the [Feed Direction]
Adjustment values are in 0.1 increments.
Press the [![]() ] or [
] or [![]() ] key to display [Adjustment], and then press the [#Enter] key.
] key to display [Adjustment], and then press the [#Enter] key.
| Registration: Adjustment |
Press the [![]() ] or [
] or [![]() ] key to select a paper tray, and then press the [#Enter] key.
] key to select a paper tray, and then press the [#Enter] key.
| Adjustment: Tray 1 |
Press the [![]() ] or [
] or [![]() ] key to select a paper type, and then press the [#Enter] key.
] key to select a paper type, and then press the [#Enter] key.
| Adjustment: *Plain Paper |
Press the [![]() ] or [
] or [![]() ] key to enter the adjustment values (-4.0 to +4.0) in the [Read Direction] from step 7, and then press the [#Enter] key.
] key to enter the adjustment values (-4.0 to +4.0) in the [Read Direction] from step 7, and then press the [#Enter] key.
| Read Direction: (-4, +4) 0.0 |
Press the [![]() ] or [
] or [![]() ] key to enter the adjustment values (-4.0 to +4.0) in the [Feed Direction] from step 7, and then press the [#Enter] key.
] key to enter the adjustment values (-4.0 to +4.0) in the [Feed Direction] from step 7, and then press the [#Enter] key.
| Feed Direction: (-4, +4) 0.0 |
Press the [Online] key.
The initial screen appears.
![]()
For Tray 2 and the bypass tray, you can adjust [Read Direction] only.
If you select [Glossy Paper] as the paper type for Tray 1, you can adjust [Feed Direction] only.