

  |  | ||
The illustrations in this manual show the ![]() model. The
model. The ![]() model may differ slightly from the illustrated model.
model may differ slightly from the illustrated model.

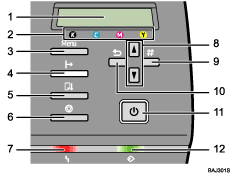
Display
Displays current printer status and error messages.
Print Cartridge End LED
Each LED corresponds to a print cartridge. From the left, the LEDs show the status of the black (K), cyan (C), magenta (M), and yellow (Y) cartridges.
[Menu] key
Press this key to make and check the current printer settings.
[![]() Online] key
Online] key
Indicates whether the printer is online or offline. Press this to switch between online and offline.
When the lamp is lit, the printer is online, enabling data reception from the host computer.
When the lamp is unlit, the printer is offline, disabling data reception from the host computer.
Press to return to the ready condition.
[Form Feed / Head-cleaning] key
When the printer is offline, press this to print all data left in the printer's input buffer.
You can use this to force the printer to print data received in the online status when the paper size or type does not match the actually set size or type.
If a message prompting you to remove the jammed paper by pressing the [Form Feed / Head-cleaning] key appears, press this key.
When the printer is offline, press and hold down the [Form Feed / Head-cleaning] key for three seconds to clean the cyan, magenta, yellow, and black print heads.
[Job Reset] key
When the printer is online, press this key to cancel an ongoing print job.
Alert indicator
Lights up whenever a printer error occurs. A red light indicates an error has occurred that makes printing impossible; the yellow light indicates a potential error during printing.
If the red light is on, follow the instructions that appear on the display.
[![]() ][
][![]() ] keys
] keys
Use these keys to increase or decrease values on the display when making settings.
Keep the key pressed to quicken scrolling, and increase or decrease values on the display in units of 10.
To apply this function: under [Maintenance], set [Key Repeat] to [On].
[#Enter] key
Press this key to execute menu items selected on the display.
[Escape] key
Press this key to return to the previous condition on the display.
[Power] key
Press to turn the power on and off.
To turn the power on, press and hold down the [Power] key for one second until it lights.
After the power is turned on, the [Power] key will flash until the printer is ready for printing, at which point the key will stop flashing and remain lit.
When the power is turned off, the key will blink slowly until the printer has completely shut down at which point the key will be dark.
![]() means “standby”. To avoid any power consumption, disconnect the power plug from the wall outlet.
means “standby”. To avoid any power consumption, disconnect the power plug from the wall outlet.
Data In indicator
Blinks when the printer is receiving data from a computer. The Data In indicator is lit if there is data to be printed.
![]()
For details about the Key Repeat, see Performing Maintenance using the Control Panel (Maintenance Menu).